3D-Druck-Einweisung
Baustelle
Diese Einweisung ist noch nicht fertig und deshalb eine Baustelle.
Meta-Kram
Vorschlag: Jede Einweisung hat einen ähnlich gestrickten Meta-Block, um auf den ersten Blick klar zu machen:
- Wer ist verantwortlich / berechtigt, einzuweisen? (Vorschlag: "jeder kann sich selbst durch lesen einweisen", "jeder Eingewiesene darf einweisen", "nur Geräteverantwortliche dürfen einweisen")
- Welche Gefahren drohen, die den obigen Punkt begründen? (Die wahrscheinlichsten Gefahren. Dass die Gefahr droht, das Gerät durch runterschmeißen zu beschädigen, ist klar und braucht keine extra Erwähnung).
Wer darf benutzen, was kann passieren?
Nur eingewiesene Benutzer dürfen die Drucker selbstständig verwenden, um Verletzungen und Schäden zu vermeiden.
Die Düse des Extruders und das Druckbett werden sehr heiß, es besteht Verbrennungsgefahr.
Unsachgemäßer G-Code kann dafür sorgen, dass die Motoren des Druckers ungebremst gegen Hindernisse fahren und sie so beschädigen. Bitte achtet immer darauf, nur gcode, der auch für den entsprechenden Drucker erzeugt wurde, zu verwenden!
Keinen Schaber, Messer oder Ähnliches verwenden, um Objekte vom Druckbett zu entfernen, da das selbiges zerkratzen kann.
Wer darf einweisen und wie?
Das ist nur ein Vorschlag und deshalb durchgestrichen:
Jeder, der selbst eine Einweisung erhalten hat, darf andere einweisen. Dazu einmal durch die Einweisung gehen und den Anwärter unter Aufsicht einen Testdruck drucken lassen. Dann $Bürokratie (TODO) ausfüllen und fertig.
Kosten und Abrechnung
"Normales" Filament kostet circa 20 Euro pro Kilo. Es gibt noch kein Abrechnungssystem, bitte daher eigenverantwortlich für Fairness sorgen. (TODO)
Einweisung
Auch wenn das 3D-Drucken unter den Begriff “Rapid Prototyping” fällt, kann ein Druck je nach Größe und Präzision gut mehrere Stunden dauern. Deshalb ist es um so frustrierender, wenn man nach Stunden hbemerkt, dass der Druck nicht geklappt hat. Damit alles gut klappt, lies daher dieses Dokument gut durch.
3D-Modelle
Modelle sollten im .STL-Format (Einheit: Millimeter) vorliegen. Man kann sich entweder seine eigenen Modelle erzeugen (z.B. mit Blender, OpenSCAD, FreeCAD, SketchUp o.Ä.), oder diese von Seiten wie https://www.thingiverse.com/ herunterladen.
Eine einfache und kostenlose Website zum Erstellen von einfachen 3D-Modellen ist tinkercad von Autodesk. Weitere Links zu Tools und Dingen findet ihr hier.
Slicer
Mit einem 3D-Modell, also einer Liste von Punkten und Dreiecken im 3D-Raum, kann ein Drucker noch nichts anfangen. Wir brauchen also erst einen Slicer, um das 3D-Modell in eine Liste von Anweisungen (Bewegungen und Temperaturwechsel) für den Drucker umzuwandeln: Den G-Code.
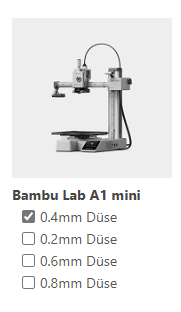
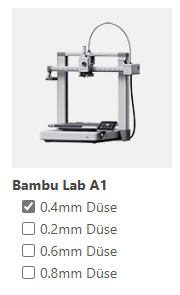
DIe Software, die mit allen Druckern vor Ort funktioniert, ist der kostenlose ORCA Slicer. D.h., dass ihr die Druckdatei damit auch außerhalb des ZAM vorbereiten könnt. Die Installation ist zu großen Teilen selbsterklärend, bis auf die folgenden Informationen, die man beim Einrichten angeben muss: Drucker, Düsen und Filamente. Die folgenden Drucker sind aktuell im ZAM (25.06.25):
 |
|
Die Einstellungen für die Drucker sind hier hinterlegt. Falls der Link evtl. nicht mehr gehen sollte: nach "Bambu" in der Suche suchen.
Todo: Düsen vervollständigen, Filamente ergänzen.
Die STL-Datei, die gedruckt werden soll, kann man über folgenden Menüpunkt importieren:

ToDo: weitere Schritte ergänzen bis zum Speichern der Druckdatei auf der SD-Karte.
Supports
Da der Drucker nach und nach Materialschichten aufeinander ablegt und nicht "in die dünne Luft" drucken kann, können manche Modelle garnicht oder nur mit Stützstrukturen ("Supports") gedruckt werden:
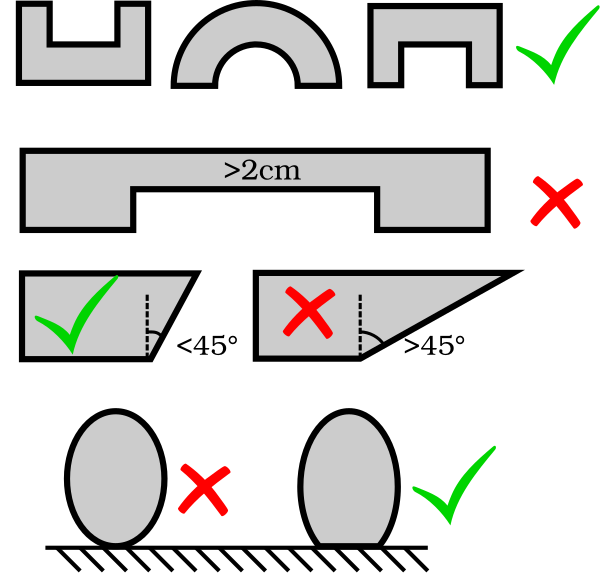
(Mit etwas Erfahrung ist ein Ausreizen der Limits über das Bild hinaus möglich, doch für Anfänger empfehlen wir ein vorsichtiges Herantasten.)
Ob der Slicer Supports erzeugen soll oder nicht, kannst du bei PrusaSlicer in der rechten Leiste einstellen.
Ebenso kann man dort den Grad des Infills (Wie hohl oder gefüllt soll das Innere des Modells werden) einstellen.
Filament
Da verschiedene Filamente mit verschiedenen Temperaturen gedruckt werden, stelle bitte das gewünschte Filament in der rechten Leiste ein (oder klicke aufs Zahnrad, um die Einstellungen selbst zu setzen), und stelle sicher, dass das Filament sich auch wirklich im Drucker befindet.
Falsches Filament kann zu fehlgeschlagenen Drucken oder sogar zum Verstopfen der Druckdüse führen.
Qualitätseinstellung
Ebenfalls in der rechten Leiste können verschiedene Qualitätsstufen ausgewählt werden. Sie unterscheiden sich hauptsächlich in der Schichthöhe, wobei eine geringere Schichthöhe eine weniger stark ausgeprägte und feinere Rillenstruktur verursacht, dafür aber auch die Druckzeit verlängert.
Grundsätzlich empfiehlt es sich, die Schichthöhe zwischen 1/4 und 3/4 des Düsendurchmessers (meist 0.4mm) zu halten.
Stellt noch einmal sicher, dass ihr vor dem richtigen Drucker steht und das richtige Filament eingespannt ist. Das Druckbett sollte zur einfachen Ablösung mit Lösungsmittel gereinigt werden, bevor der Druck beginnt. Neben jedem Drucker steht das entsprechende Mittel und ein Schwamm. Wenn außen an der Extruderdüse Rückstände sind, wischt die nach dem Aufheizen auch ab (Vorsicht, heiß!).
Schaltet den Drucker an (Schalter ist meist hinten rechts), schiebt die SD-Karte hinein und wählt eure Datei aus.
Der Drucker wird automatisch mit dem Vorheizen beginnen und seine Motoren in die Begrenzungsschalter fahren. Nach einigen Minuten beginnt der Druck. Am besten wartet ihr die ersten paar Schichten ab, da hier noch am ehesten etwas schief gehen könnte.
Gedrucktes Objekt abnehmen
Nach dem Drucken den Drucker bitte wieder abschalten, Druckbett und Düse von Rückständen befreien und diese im Mülleimer entsorgen. Das Druckbett ist magnetisch und wird nach etwas Abkühlen abgenommen, um durch sanftes Biegen der Platte den Druck von ihr zu lösen.
Checkliste vor dem Druck
- Filamenteinstellung passt zum tatsächlich verwendeten Filament?
- Druckereinstellung passt zum tatsächlich verwendeten Drucker? (Für Fortgeschrittene: einschließlich Düsendurchmesser)
- Überhänge, in der Luft hängende Brücken etc angemessen mit Supports gestützt?
- Anfangsphase beobachten. Bei "Spaghetti" den Druck abbrechen, bei "ungesunden Geräuschen" sofort den Drucker am Ausschalter ausschalten.
- Druck vorsichtig(!) entfernen, Sauberkeit wiederherstellen.
Fortgeschrittenes
Wechsel der Druckdüse
TODO
Wechsel des Filaments
TODO
Lizenz des Dokumentes
Verbreiten und Bearbeiten dieser Inhalte ist ausdrücklich erwünscht, du musst (in der Regel) nur
- Quelle und Lizenz korrekt angeben, wie etwa: Betreiberverein-Wiki: Benutzer-Einweisung 3D-Drucker, https://wiki.betreiberverein.de/books/werkstatten/page/benutzer-einweisung/, Lizenz CC-BY-SA 3.0, https://creativecommons.org/licenses/by-sa/3.0/.
- das neue (gesamte) Dokument auch unter dieser Lizenz veröffentlichen.
Dieses Dokument „Benutzer-Einweisung 3D-Drucker“ des ZAM und weiterer Autoren ist, bis auf besonders gekennzeichnete Stellen, lizenziert unter einer Creative Commons Namensnennung – Weitergabe unter gleichen Bedingungen 3.0 Unported Lizenz. Um eine Kopie dieser Lizenz zu sehen, besuchen Sie http://creativecommons.org/licenses/by-sa/3.0/.
Dieses Dokument basiert auf FAU FabLab et al.: Einweisung 3D-Drucker, https://github.com/fau-fablab/3d-druckereinweisung, Lizenz CC-BY-SA 3.0, https://creativecommons.org/licenses/by-sa/3.0/.
No comments to display
No comments to display